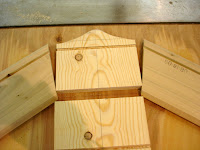
The next Noah's Ark will be one made with Crown Molding for the Hull. Crown molding can be very expensive to purchase. But If you know a builder, or a trim carpenter; ask them for some end cuts. To start this ark, I make 22 1/2 degree cuts at the ends of the each piece of 17 inch crown molding.


I next determine how wide I want the ark to be, and cut 3/4" wood to that width. The length is usually about 1 1/2 inches taller than the crown molding. Use a compass to mark a curve to be cut off each end piece. Scroll down to see the "assembled" ark.
Next determine where the deck should be. I use a table saw to make a groove that will hold the deck. This cut is made at the same level on both ends and the hull sides. If you do not have a table saw, you can glue cleats on the inside of the end pieces and the sides that will allow the deck to sit on top, and provide a surface for glue and brads.

Here's what the Ark hull will look like.

Next start on the cabin. The cabin is made of salvaged 1/4 inch birch plywood. Make the cabin any size you wish. Mark and cut two cabin ends, and two cabin sides. Nail the ends together, and nail the sides together. Mark the door on the end piece, and the windows on the side pieces.
Use the scroll saw to cut out the doors and windows. Since the ends and the sides are matched/stacked and nailed together, you cut both the windows and the doors at the same time.

This is what the Crown Molding Ark will look like with out the roof pieces.

Here's the painted and assembled Crown Molding Noah's Ark. Notice that I added the bow and stern pieces. I'll have to cut and attach some leather hinges to the roof sections and attach the roof. But this is basically the completed Crown Molding Noah's Ark,


No comments:
Post a Comment