Monday, October 21, 2013

2013 NOAH"S ARKS

The following or similar Arks have been made for Christmas seasons.  These Arks range from $75 to $400, depending on their size and the number of pairs of animals.  Prices are for comparison only

 $300, 24 pairs larger animals

 $75, 10 pair small animals

 $100, 16 pair small animals

$175, 18 pair larger animals

Monday, October 14, 2013

Arks at the Columbus Chippers show.

Here's one of my larger Arks, at the Columbus Chippers carving show.
And a smaller Ark too.  The bigger animals in the smaller ark are about 2 inches long.

Sunday, July 21, 2013

More Noah's Ark's

I'm attempting to be ready for the season.  Will usually go into the Christmas season with 10 to 15 Noah's Ark's and pairs of animals.  This is something one does not want to put off till the last moment.

Wednesday, April 10, 2013

Finishing The Small Ark

I have found that it is always easier to paint the ark in pieces, before you assemble it.  Once the colors are selected for the main parts of the ark, I like to paint the pieces without any sanding.  After the ark is assembled, I sand the corners where ware would occur; thereby achieving a bit of instant age for the ark.  The pieces and parts of the ark that will receive separate colored paint are:  roof, cabin(s), cabin floor(s), deck, ark sides and ends, and trim if any.

 
For this ark I decided that the deck, cabin floor, and roof would be the same color (green).  After the paint has dried, assemble the ark.  I use I use carpenters glue, and brads.  For the larger arks I like to use screws to attach the cabins to the decks.
 
Before actual assembly select, measure and cut the leather for the hinges (roof and hull door); and attach them.  To attach the leather hinges, I use glue and small tacks.  Follow the steps as listed:
 
1.  Glue and nail the stern and bow trim pieces.
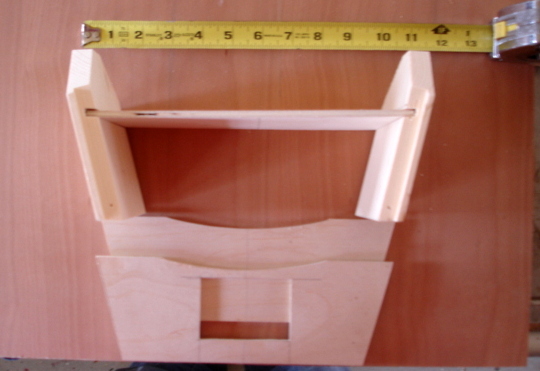
2.  Center and attach the first deck cabin to the hull deck.
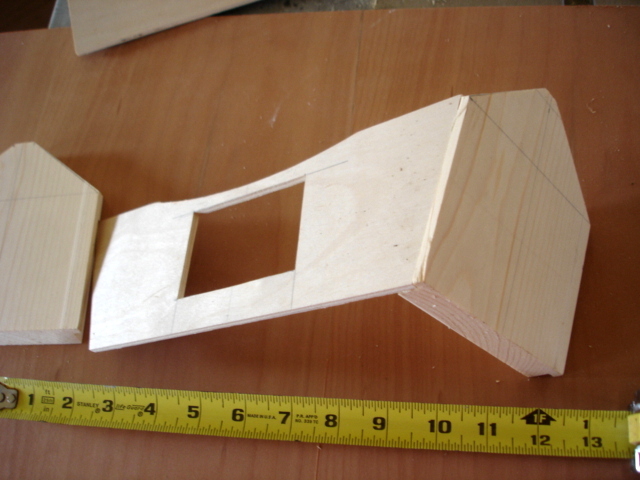
3.  Insert the hull deck and cabin assembly into the dados in the bow and stern pieces.
4.  Attach the hull sides to the bow and stern pieces.  Use glue and brads, and make sure the hull is square.  Note: Use 1/2" - 5/8" wire brads or a small nail gun.  If using brads, clip the brad heads off after starting them, then hammer flush.  If this is done no nail hole filing is necessary).
5.  Center and attach the hinged roof assembly to the second deck cabin.
6.  Center and attach the second deck cabin and roof assembly to the second deck.
7.  Center and attach the second deck and cabin assembly to the first deck cabin.
 
Sorry for "jumping the gun" and adding some small animals.  Just had to see what it looked like.  I still have to add a small knob to the hull door, and sand the ark.


Sunday, April 7, 2013

New Ark - To Size

When sizing and designed an Ark to fit certain animals, I like to start with the side profile of the ark hull.  First I set out two carved animals, one the largest and one the smallest.  The finished ark should be in proportion to handle both the large and the small.  For this small ark I'll select the hippopotamus and the swan.

For the actual ark I'll want something more than a plain "slab-sided" hull.  I'll need a hinged door in one side, and a bit of trim over that door.
The next pieces to measure and cut are the ark ends.  Notice the cut on the ends to accept the sides.
After the ends are laid out and cut, a dado is cut into the insides of the ends; to accept the deck.
Next, I like to layout and cut the bow and stern trim pieces.
 
Here's the basic Ark's hull with main deck, and stern or bow trim.

We need this in order to size the main deck cabin.  When determining the size of the main deck cabin, I like to leave enough space between the cabin and the ark sides to accommodate an animal.
 
 
There needs to be a top to this main cabin and one more cabin with hinged roof. 
 

I'll need to add a hinged door to the ark hull and more trim, before I paint.
 
 
.


Wednesday, April 3, 2013

Designing Ark for Smaller Animals

I'll bet few have given any thought to designing and sizing a Noah's Ark for specific animals.  I like to consider the design or the style of an ark before I consider the size.  Here's some "givens" for Noah's Arks that kids play with, as I have discovered them:

The size of the animals determines the ages of the kids that can play.  The small animals are not suited for the very young.  The small animals might get swallowed.

NOAH'S ARK THAT KIDS PLAY WITH

All the pairs of animals must be able to be stored within the ark.

Kids like lots of windows. Kids like lots of doors that open and close.

Ramps are fun for the kids to move the animals into/out of the ark.

Ark should not be top heavy, where it may fall over easily.

Less detail, that may get broken in heavy play.

NOAH'S ARKS PRIMARILY FOR DISPLAY 

May be sized to fit on a shelf.  May be narrower.  Maybe taller.

Lots of windows and doors that open and close.

May have lots of detail.

As I work up a plan for an display ark for the smaller animals I'll probably add to the above lists..

Thursday, March 28, 2013

Animals for a smaller ark

I generally like to whittle and carve smaller items.  Following up on a previous post about carving a small horse, I am doing about 20 pairs of smaller animals for a smaller ark.  After I finish the animals I'll size the ark to the animals.
Here's a sample of some of the animals.  The pocket knife is included as a size reference.  The animals were carved with a cheap rotary tool and a sanding sleeve.

Saturday, February 23, 2013

Mini Horse Completed

Very few details are required on this mini horse.  I don't want to sand the horse.  I like the flat spots and other non smooth areas.  These mean the horse was hand done, not plastic.  The detail involves the face/head, separating the ears, and a V-tool on the mane.

Sunday, February 17, 2013

Carving the Mini Horse - Part 2

The following step-by-step carving is the way I approach the shaping of the horse, with a rotary tool.  You can see that I use a 1/2 inch sanding drum and sleeve.  I also will use a well worn sanding sleeve to achieve the final shaping.  I prefer this well worn sanding sleeve because it kind of burnishes the wood, eliminating the need for sanding.  I hate sanding.

STEP 1
This first step involves separating the head from the neck area.  Merely thin the neck area below the head.  As soon as you shape one side move directly to the opposite side and repeat the shaping there.


STEP 2

The second step is to shape the the head. Use the thickness of the neck to determine how thin to make the head.

 
STEP 3
The third step is shaping and narrowing the front legs.


STEP 4
 
In step 4 narrow and shape the horses back.  When shaping the opposite side, be sure to round the horses back.
 
 
STEP 5
 
Step 5 is rounding the horses belly.


STEP 6
Step 6 is separating the bobbed tail from the horses body.  Thin and round the bobbed tail.
 
 
STEP 7
Step 7 involves shaping / thinning the horses rear legs.
 
 
These steps have roughed in the horse.  Next we'll add some detail.  There are several levels of detail that can be added.
 
Check back!


Mini Ark - Mini Animals - In the Making - Part 1

In looking for a challenge I have decided to make a mini Noah's Ark with mini animals.  Sorry for the unintended pun.  I will let the size of the finished animals determine the size of the ark.  However, I am talking smaller animals. One to two inch in length as well as height; there are a few exceptions.

The round shape in the center of the photo is a quarter.  This quarter is for a size reference.  I used a copy machine to reduce my regular patterns to the smaller size.  I copied the images on index paper and covered the index paper with clear packaging tape, prior to cutting the animal patterns out.  This application of tape makes the patterns easier to trace and the are more durable.  NOTE:  I use side /silhouette views of the animals and have had to redraw the legs on some.  I show just the front and rear legs, and they are not separated from right to left.  This feature is to add strength and prevent breakage of the legs.


A word about the wood that you trace the patterns on to.  I use Redwood or Cedar, because of its properties when sanding.  These woods have resins in them that seems to prevent the wood from fuzzing up when sanding; which means that a minimum of finish sanding before painting is required.  There is a down side.  DON'T BREATH THE DUST.  Use a good mask or blow the dust away as you sand.  NOTE:  Notice that in the above photo there are two of each animal.  This is a Noah's Ark project.  Since animals are different is thickness, the wood you use should also be different thicknesses.  Just think of the animal butts.  The elephant has a bigger butt than a Cheetah.  Use thicker wood for the big butt animals and thinner for the smaller.  I'm using 1 inch as the thickest and 1/4 inch for the thinnest.  Also notice the direction of the wood grain in reference to the placement of the patterns.

The tools that I use to carve these animals are:  power rotary tool, sanding drums and sleeves, diamond burrs, and the a scroll saw.

 
You'll have to use a thin blade in the scroll saw to make the tight turns when cutting the mini animals out.  I tape a thin piece of plywood to the scroll saw table that covers the hols for the blade.  This prevents the smaller trimmed pieces as well as the small animal from falling into the hole.
 
 
This posting is part 1 of a series.  The next posting will focus on how I carve the animals using the power rotary tool and sanding drum/sleevs.  A later posting will address the design and construction of an appropriate Ark for the animals.